


 |
LONDON TRANSPORT
Transfer Tutorials

RTS Tutorial
(Resticted Pre 1948 STL, RT, SRT, RTL, G, D, B, and STD)
| All
transfers designed by Little Bus Company are authentic image waterslide transfers. This
means that to release them from the backing card will require a small quantity of water. The following illustrations show a step by step
method to refinish an E.F.E. Diecast G Repainted Model.
The following transfer set used is RTS 175
destination set from the London Transport series.
The set provides the following options
- A Restricted blind with the bus terminating
at BLACKWALL TUNNEL or STAPLEFORD ABBOTS or FORD WORKS
- Or terminating at BLACKWALL TUNNEL and
changed at a later date to FORD WORKS by overlay
|
|
 |
|
 |
|
 |
|
|
|
|
|
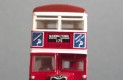
| 1. The RTR 175
transfers come on a card such as this and each of the set blinds are layed out as above |
|
2. Now we take the
model of the G. |
|
3. Taking a pair of
scissors, make two Vertical cuts, leaving three sections, as above |
|
|
|
|
|
|
|
|
 |
|
 |
|
|
|
|
|
| 4. Working
Anti-Clockwise around the G, starting with the Front. |
|
5. Cut the complete
front destination blind (showing 'BLACKWALL TUNNEL' as the Ultimate Destination) from the
set, making sure you cut above 'BLACKWALL TUNNEL' and above 'FORD WORKS'. Keep the
discarded ones in a safe place and put the one you are going to use into a saucer of water
for a few seconds. |
|
6. Take the transfer
on the backing card and slide onto the front of the prepared model and position as
required removing surplus water with a small piece of kitchen roll |
|
|
|
|
|
 |
|
 |
|
 |
|
|
|
|
|
| 7. Cut the Side
Destination Screen from the Transfer Set and place in a saucer of water for a few seconds. |
|
8. Take the Transfer
on the backing card and place the Side Destination Blind on the G as here. |
|
9. We can produce a
different Destination Blind for the Front by cutting immediately above 'STAPLEFORD ABBOTS'
and above BLACKWALL TUNNEL' to produce 'STAPLEFORD ABBOTS' as the Final Destination, as
here. |
|
|
|
|
|
 |
|
|
|
|
|
|
|
|
|
| 10. And Finally we can
produce yet another Destination Blind by cutting immediately below 'ROMFORD DAGENHAM' and
above '175' to give FORD WORKS as the Final Destination, as here |
|
Please note that
the 'G' did not carry a Rear Destination Blind, but did carry a Route Number Stencil
Plate, which is provided in the Transfer Sheet for the RTS 175. Remaining Destination
Blinds, such as the 'STAPLEFORD ABBOTS' Screen, can be overlaid to produce another
Destination. Same procedure above can be applied to a Roof Box RT. |
|
|
© 2001-2015 All rights
reserved.
LITTLE BUS COMPANY
2 BROOKSIDE COTTAGES,
BARLOW, DRONFIELD, DERBYS. S18 7TB
Tel. 01246
230468 email:
karl@little-bus.com
Tel. 01422
301600 email:
tony@little-bus.com
If you have had any problems using this website
(Dead links, Photos which do not appear, etc.) please use this email:
|
